1. Add the highlighted arguments to your EXTRA_JAVA_PROPERTIES in the $DOMAIN_HOME/bin/setDomainEnv.sh script by adding the highlighted text:
EXTRA_JAVA_PROPERTIES="${EXTRA_JAVA_PROPERTIES} -Xmanagement:port=7091,ssl=false,authenticate=false,autodiscovery=true"2. Restart the managed server(s).
3. Download JRockit from here (second link is specific to 64-bit Windows):
http://www.oracle.com/technetwork/java/javase/downloads/java-archive-downloads-jrockit-2192437.html
http://download.oracle.com/otn/bea/jrockit/jrockit-jdk1.6.0_45-R28.2.7-4.1.0-windows-x64.exe4. On your local laptop, double-click on jrmc.exe located in the C:\Program Files\Java\jrockit-jdk1.6.0_45-R28.2.7-4.1.0\bin folder.
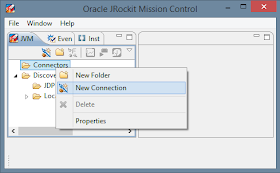
5. Right-click on "Connectors" and click on "New Connection":

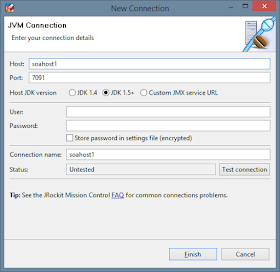
6. Simply enter the HOST and click on "Finish" (note that the port 7091 is the default and is what was configured in the EXTRA_JAVA_PROPERTIES earlier):

7. Right-click on soahost1 (or whatever host you created) and select "Start Console" to start viewing some impressive real-time metrics:
Good luck!
Applicable Versions:
- Oracle WebLogic Server 11g
- Oracle JRockit JDK 1.6.0


No comments:
Post a Comment